 NOVA STUDIOS




- About Simosuchus
- What is in the Simosuchus skeleton STL download
- Printer size you need
- Printing the Simosuchus skeleton STL
- Assembly and the base
- Questions people ask
- Licence
About Simosuchus
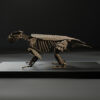
This Simosuchus skeleton STL builds my life-size reconstruction of Simosuchus clarki, the pug-nosed crocodyliform from the Late Cretaceous of Madagascar. It stands on its own four feet, about 800 mm from the tip of the snout to the tip of the tail and 330 mm tall, with the armour of the back and the limbs in place.
Simosuchus doesn’t look like a crocodile, and that’s what makes it worth building. Most crocodyliforms have a long, low skull. This one is short and deep, almost a cube, with a blunt snout and a short lower jaw. Its teeth are small and shaped like leaves, close to those of plant-eating iguanas, so it probably ate plants. The name means pug-nosed crocodile.
Its fossils come from the Maevarano Formation in the northwest of Madagascar. Gregory Buckley and colleagues described it in Nature in 2000, from a complete skull and lower jaw and the front half of a skeleton. Later expeditions found more skulls and skeletons, and today almost every bone is known. The Wikipedia page on Simosuchus gives a short overview.

Bony plates, osteoderms, covered its back, its tail, its belly and, unusual for a crocodyliform, much of its limbs. Over the back they lock together into a stiff shield. It also had the shortest tail of any known crocodyliform, with no more than about twenty vertebrae.
I built the Simosuchus skeleton STL in Blender at life size. It follows the 2010 Simosuchus monograph of the Society of Vertebrate Paleontology, edited by Krause and Kley, with separate chapters on the skull, the backbone, the limbs and the osteoderms. As far as I know it is the first complete Simosuchus skeleton made for 3D printing. Where the fossils leave a question open, so does the model, and the manual lists the sources I used.
What is in the Simosuchus skeleton STL download
- 37 STL parts: the skull and the lower jaw, the backbone in eleven sections (the neck, the ribcage in five, the pelvis in two halves and the tail in three), the shoulder girdle in two halves, the humeri, the forearms with their hands, the femora, the shins with their feet, ten osteoderm plates for the limbs and the dorsal shield in four plates
- About 800 mm from the snout to the tip of the tail, 381 mm across the limbs and 330 mm tall
- Holes for the steel already in the parts, 4.2 mm for the 4 mm pins and 2.5 to 2.7 mm for the 2 mm pins. The femora, the forearms and most of the osteoderms go on with pegs and tabs printed on the parts
- The armour of the back and the limbs. The belly armour is not part of the kit
- A 22-page assembly manual (PDF) with a render for every step and the cut lengths for the steel
- Files in millimetres, ready to print at 100 %

Printer size you need
The Simosuchus skeleton STL prints in parts, so your printer only has to fit the biggest one. That’s ribcage 1, the front section of the trunk, at 196 mm along its longest axis.
Every part fits a 220 × 220 mm FDM bed. Every part also fits a 10-inch resin printer, turned on its end where it has to be. Ribcage 1 and ribcage 2 only fit standing up, and need about 200 mm of build height, so check the Z height of your printer before you start.
Printing the Simosuchus skeleton STL
The Simosuchus skeleton STL comes without supports. That is on purpose: where supports go depends on your printer, your material and how you turn each part, so that call is yours. Keep them out of the holes for the steel, the peg sockets and the slots for the tabs, because a support inside a hole closes it.
On FDM, a 0.4 mm nozzle at 0.08 to 0.16 mm layers works well in PLA or PLA+, with tree supports, four walls and 15 to 20 % gyroid infill. Switch to a 0.2 mm nozzle for the hands, the feet and the tip of the tail. On resin, use a 0.03 to 0.05 mm layer height, tilt the parts 20 to 30 degrees and hollow the skull, ribcage 1 to 3 and the pelvis with 2.5 to 3 mm walls and drain holes. Wash and cure resin parts fully. Epoxy bonds poorly to resin that is still tacky.
The files are dense, so give your slicer time. The osteoderms are where a fine layer pays off: the pits in the plates are in the model, and they’re what makes the armour read as bone.

Assembly and the base
The Simosuchus skeleton STL goes together in a fixed order. The two halves of the pelvis first, then the hind legs. The ribcage goes on from the hips forward, then the shoulders and the forelimbs, the tail, the neck and the skull. The dorsal shield goes on last. Its four plates are joined on the bench, then the whole shield sits down on two thin pins over the backbone.
Steel holds it together: fourteen 4 mm pins and five 2 mm pins. You supply one metre of 4 mm rod and half a metre of 2 mm rod, which leaves margin for a mis-cut, two-part epoxy for the steel and the joints that carry weight, and medium CA glue for the osteoderms on the limbs. Building it takes a weekend, most of it waiting for epoxy. Dry-fit every joint before you glue it.
It stands on its own four feet, so a base is optional. For a museum-style display there are two sockets under the backbone, one under ribcage 1 and one under the pelvis, 310 mm apart. Two 4 mm rods come up into them from a board of about 850 × 450 mm, at least 20 mm thick. The manual gives the rod lengths. The board and the steel are not included.
If you like plant-eaters that don’t look the way you’d expect, the Lystrosaurus skeleton is a tusked relative of the mammals from the Permian and the Triassic, and the rest of my 3D printed skeleton files are on the STL page.

Questions people ask
Can I print the Simosuchus skeleton STL smaller or bigger?
Yes, as long as you scale every part by the same factor. The holes for the steel scale with the print, so the rods have to get thinner too. At 50 % the 4.2 mm holes become 2.1 mm: use 2 mm rod there and 1 mm rod in the small holes, and halve every cut length in the manual. At any other scale, multiply the rod diameters and lengths by the same factor and round the diameter down.
Will it fit my 10-inch resin printer?
Yes. Every part fits. Ribcage 1 and ribcage 2 only fit standing up, at about 200 mm of build height, so check the Z height of your printer first.
Does the Simosuchus skeleton STL need a base?
No. It stands on its own four feet. The base is only for display: two 4 mm rods from a board into two sockets under the backbone. The manual gives the rod lengths and how to mark the holes.
Is the belly armour included?
No. The kit has the dorsal shield over the back and the osteoderms of the limbs. Simosuchus also had armour on its belly, and that is not part of this model.
Is the skull of the Simosuchus skeleton STL one piece?
Yes. The skull prints as one part of about 145 × 112 × 99 mm. The lower jaw is a separate part and goes on with two 4 mm pins.
Which parts should I print first?
The two halves of the pelvis and the five ribcage sections. They carry the whole animal and you build with them first, so check them, and the fit of a 4 mm pin, before you print the limbs and the armour.
How do you paint a fossil skeleton like this?
A mid brown base, a thin dark wash pulled into the cracks and the pits of the osteoderms and a dry-brushed highlight on the ridges reads well on a fossil skeleton. Prime first, and keep the steel matt so the eye reads it as mounting hardware.
What file format is the Simosuchus skeleton STL?
STL, one file per part, in millimetres. Every file carries its part number in the name, so the files and the manual always match, and paired parts carry their side.

Licence
The Simosuchus skeleton STL is for personal use only. You can print it for yourself as often as you like. You may not resell or share the files, sell printed copies, or print it for other people as a service. Commercial licences are available on request. Instant digital download, nothing is shipped.


Reviews
There are no reviews yet.